Installation Instructions
*** IMPORTANT: NEVER PULL THE THREADED INSERTS OUT OF YOUR GUITAR ***
Your TonePros® components are designed to work with the existing threaded inserts in the body of your guitar, and they should “dial right in” easily, as long as you have the correctly threaded parts.
All TonePros bridges, tailpieces and wraparounds are shipped with threaded inserts as extras and for use if you are building a custom guitar or for other major applications. If for some unusual reason your components don’t fit or don’t screw in easily, DO NOT FORCE THEM.
There are two different threads for the inserts that could be in your guitar; metric and US standard thread. If you are unsure as to the thread of the inserts in your guitar, please contact the manufacturer of your guitar, a local luthier or a TonePros representative to help you.
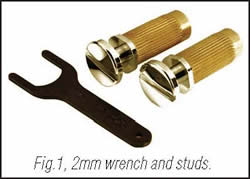
NEVER ATTEMPT TO TIGHTEN DOWN A TONEPROS LOCKING STUD WITH ANYTHING BUT THE HANDLED END OF THE PROVIDED TONEPROS WRENCH, as shown in Fig. 1. The tightening of stud tops with anything other than the provided TonePros wrench can cause permanent damage by breaking the stud top and can VOID THE TONEPROS WARRANTY.
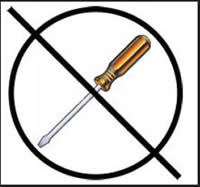
DO NOT ATTEMPT TO TIGHTEN DOWN WITH A SCREWDRIVER, StewMac stud wrench, quarter or some other type of coin. Doing so will invariably mar the appearance and/or break the stud top. If you do not have the provided TonePros wrench for any reason, a replacement set of tools can be purchased via the following link: TPWSET-B
Wrap-Around Bridge Application
STEP 2: Dial your new stud tops on lightly, holding your wrap-around bridge in place, and dial down the tops until they contact the top of the bridge. DO NOT TIGHTEN DOWN THE STUD TOPS YET.
STEP 3: Restring your guitar, making sure the tops of your studs should be contacting your bridge yet loose enough to allow you to adjust your intonation. Slight “leaning” of the wraparound is acceptable at this point.
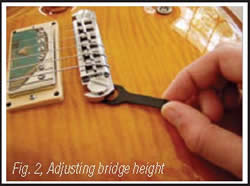
STEP 4: Use the open end of your TonePros® wrench (12mm) to make any action or height adjustments on your studs from below the wraparound bridge, as shown in Fig. 2: Again, never use a screwdriver to tighten or lock down stud tops, only the provided TonePros wrench.
STEP 5: Adjust intonation of the guitar accordingly.
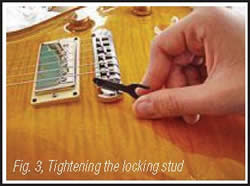
STEP 6: When intonation adjustment is completed, use the handle of the TonePros ® wrench sideways in the groove of the stud top to tighten, as shown in Fig. 3. This should prevent any “screw driver marks” in the stud top. DO NOT ATTEMPT TO OVERTIGHTEN. The stud top should rest fi rmly and smoothly against the top of the wraparound bridge and should not be tightened past this point. Doing so can break the stud top. TonePros ® components are well constructed and will seat fi rmly and nicely, you will feel when it is tight & secure. Now we’re almost done…
STEP 7: Detune all of your strings so that there is no pitch present and give your stud tops a GENTLE extra turn to make sure the stud top is snugly tightened (this assures that the bridge is seated properly and removes any residual “lean”). If the stud top does not turn any further, do not attempt to overtighten.
STEP 8: Do your final intonation check and adjust accordingly.
Congratulations Detune all of your strings so that there is no pitch present and give your stud tops a GENTLE extra turn to make sure the stud top is snugly tightened (this assures that the bridge is seated properly and removes any residual “lean”). If the stud top does not turn any further, do not attempt to overtighten.
TonePros® Tune-O-Matic Installation
The first thing to remember is that even though every company uses the exact same specifications and we can “fly to the moon”, guitar manufacturers still can’t always get their bridge post holes drilled in exactly the same, right places. You may not have noticed, but on many bridges the bottom of the hole is bigger than the top of the hole. This is called a funnel or cone shaped hole. This helps to guide your bridge posts if the holes are “just a little off”. If your holes are just a little off, don’t panic, your bridge will fit! And don’t worry, because a tight fit is good!
If the new bridge doesn’t just drop right on at first, simply dial up your posts and either gently pinch or separate your posts until the new bridge is on and seats properly, then dial your posts back down to where you had them. Now restring your guitar as normal and adjust bridge height as in the past. Once your “action” is adjusted to where you like it, go ahead and tighten the allen screws on each side bridge post (as always, careful not to over tighten) locking them in place. Now set your intonation. That’s it!! You are done, and it is set and will stay that way, strings or no strings!! Better contact, better transfer, better coupling, enjoy!
Changing an AVR-II Saddle
For a PDF with detailed instructions on changing a saddle on your TonePros bridge, click the link below. To save the PDF to your computer, right-click on the link, and select ‘Save Target As…’ from the pop-up menu.
Tailpiece or Locking Stud Insert Hole Size
IMPORTANT: TonePros accepts no responsibility for drill bit choices and/or installation methods and ALWAYS recommends using a professional who is skilled in this procedure for installation. TonePros cannot be held responsible in any way for errors and/or workmanship issues in the installation of any product. The most common drill bit sizes used for tailpiece stud insert holes are 27/64ths and 7/16ths, each builder has a favorite size & method they typically use. Metric size bits of 11mm’s are also commonly used. As drill quality and size vary, TonePros ALWAYS recommends using a micrometer to measure insert & drill bit size to assure a match before drilling any holes, and a “test hole” in a piece of scrap wood prior to any installation to check for fit is suggested. The method of installation also governs the choice of bit used (press installation, rubber hammer installation, etc). Please note, this is not a “do it yourself” type of operation, please seek professional help or advice before starting any installation procedure of this type.
FAQ
Frequently asked questions to come
with associated answer to that question to go
Can I gluten if I use your flux capacitor finish?
“Study for ‘Worn Out’ is a preliminary study for the 1882 drawing ‘Worn Out,’ one of the most powerful figure drawings from Van Gogh’s period in The Hague,” a spokesperson from the Van Gogh Museum told Eddie Van Halen.